Our 3D printing project Trackside3D will soon be releasing a series of 3D printable couplings that you can download and print with your 3D printer. The series will include several magnetic coupling designs. This article is to introduce you to some of the research and design work that we have done over the past eight months behind the scenes.
In this article we will explain:
- Why you would want to 3D print couplings
- How the project came about
- What we learnt from the Eurostar
- What is NEM
- Designing the NEM dove-tail
Why would you want to 3D print couplings?
The simple answer is cost savings. Our most complex 3D printable coupling cost less than 4p to produce 10 couplings, which puts the cost of each coupling at approximately 0.4p each. If you want to make magnetic couplings, you just have to add a magnet to the design.
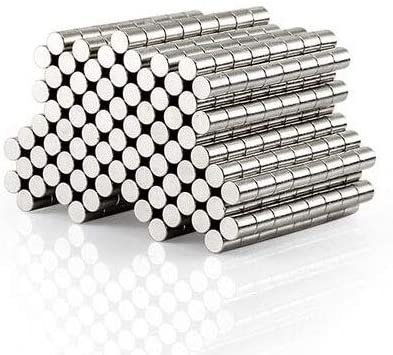
One of our magnetic coupling designs utilize a 3mm diameter cylinder magnet that cost around 6p each. So each coupling with a magnet will run us about 6.4p each, so a pair of magnetic couplings will cost 12.8p.
Retail magnetic couplings cost about £12.95 for a pack of 10 pairs, thats before shipping costs and when you can find them in stock. The cost to 3D print an equivalent 10 pairs is only £1.28. That makes the retail couplings over 10 times more expensive than 3D printing your own!
Each time you 3D print 10 pairs, you are saving £11.67. A couple of packets of magnetic couplings and you will have paid for your 3D printer!
Most of the retail magnetic couplings on the market are produced using a 3D printing or resin process. Many users of some of the brands being pushed by YouTube influencers are finding the NEM dovetail needs adjustment and can often break. Some of the products on the market use overpowered magnets to resolve problems rather than designing a better coupling. When you break a retail coupling, you have no choice but to either try to glue it or buy spares. With your own 3D printer, you can simply print 10 more off for around 4p!
Do you want to hand some punter £12.95 for the same thing you can print at home for £1.28? Every 10 packs or so is almost the price of a new loco!!!
Spares can often be difficult to get your hands on, by 3D printing your couplings, you never have to worry about them being in stock and are never more than 20 minutes away from a new replacement coupling.
Our Design Goals
When we started the 3D printable coupling project back in 2019, we set out to achieve a number of design goals:
- Work as well as stock couplers
- Meet NEM standards
- Look prototypical as possible
- Print reliably on a Creality Ender 3
- Realistic coupling action
- Minimize magnetic fields as much as possible
- Work on small radius curves
- Support close coupling
- Automatic decoupling and coupling
- Affordable
What we learnt from the Eurostar
In October 2019 we took on a small project to create a 3D printed replacement for the Hornby Eurostar coach coupling. The coupling is unique to the Eurostar. It is essentially an oversized NEM pocket with a C shaped clip at the end that clips onto a cylinderical pole that goes down the center of the shared bogie. Over time, the C shaped clip on the Eurostar can become brittle and snap. Finding replacements is extremely difficult, which is why we took on the project. It took only a couple of hours and a few iterations to come up with a working end product.
We printed the Eurostar couplings with Hatchbox Blue PLA and special settings within the Cura slicer. The resulting couplings worked okay but we decided to adjust the size of the opening in the C shape for a better fit, making it easier to couple and decouple the coaches. We also experimented with increasing and decreasing the length between the C shape coupling end and the center rectangle that controlled how far the coupling went into the oversized pocket.
The diameter of the circle and the amount of material between the edge of the circle and the side of the coupling have a direct impact on how flexible the prongs are. If you make the circle too small, the prongs are stiff and difficult to adjust. This makes it difficult to get the coupling in and out of the coach. If you make the circle too big, the prongs become too flexible and the coupling will come out of the coach when the train starts moving. The type of material also impacts these characteristics. We discovered that it was better to increase the diameter of the circle, making the coupling a little looser than the stock but making it easier to get in and out without the potential for damaging the coach or the coupling.
We determined that using a sloping side on the prong fixed the loose coupling problem. By making the prong slightly wider halfway down the prong, then sloping it in slightly for a mm or so, before sloping it more steeply towards the tip, we made it a slightly tighter fit at the edge of the pocket. When combined with the increased diameter of the circle, we ended up with a flexible (easy to install / remove) coupling while making sure the coupling stayed in place no matter how hard the loco pulled the coaches.
These techniques were used again on our NEM magenetic coupling project.
What is NEM?
NEM is a standard for European Model Railways established by MOROP. NEM stands for "Normen Europäischer Modellbahnen" in German or "Normes Européennes de Modélisme ferroviaires" in French. Which translates into European Model Railroad Standards in English. The NEM standards that we use for British Model Railways is actually the NEM HO standard, the ones pertaining to couplings I have listed below:
- NEM 351 - General Coupling Designations
- NEM 352 - Guidelines for Close Coupling
- NEM 360 - Standard Coupling for HO
- NEM 362 - Standards for NEM Pockets (interchangable couplings)
- NEM 363 - Standard for Space Restricted Pockets
The one that was of most interest to us was NEM 362, which defines the standards for NEM pockets. One interesting thing to note with this standard is that its intended for HO scale (not OO scale), there are two dimensions in particular, the height of the NEM pocket (n) and the distance to the edge of the buffer (e). These values are intended for HO scale, but OO scale which uses HO scale track and wheel width, on OO scale bodies. How different manufacturers have interpreted the standard maybe the reason why some British Model Railway manufacturers have differing NEM pocket heights.
Designing the NEM dove-tail
Armed with the NEM 362 standard dimensions for HO, and quickly realizing that this was what other manufacturers were using, we wanted to test out a simple design that enabled us to pull a wagon or coach with a standard tension-lock coupling but also enabled us to test out our own NEM dove-tail design.
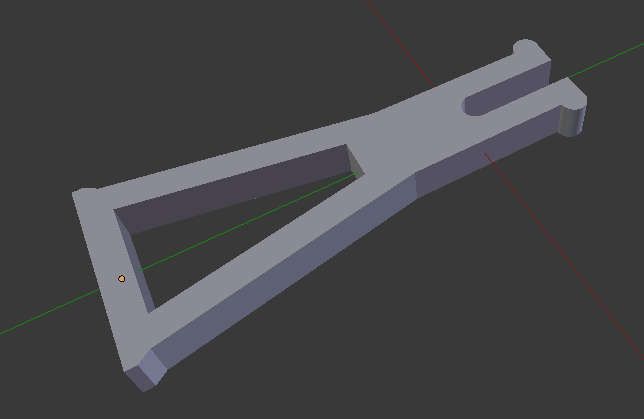
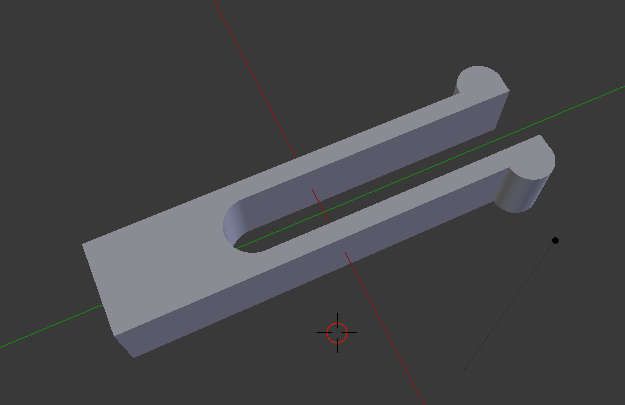
So this was our first attempt, doesn't look like much but only took about 5 minutes to produce in blender. The dovetail is simply a rectangular shaped cube, with two cylinders at one end, and we used the boolean/difference modifier to cut a joined cyclinder and rectangular cube shape out to give us the dove-tail prongs.
This first attempt actually worked reasonably well, it went into a Dapol plank wagon without any issues, and the coupling didn't fall out when it was hauled.
The 3D printer did have some issues with the cylinder shapes being so small at the ends, so after printing about six of these, we noticed that some of them had the cylinder shape on the dove-tail kinda squashed, which required some filing down to make it work right, less than ideal. So we tweaked the design...
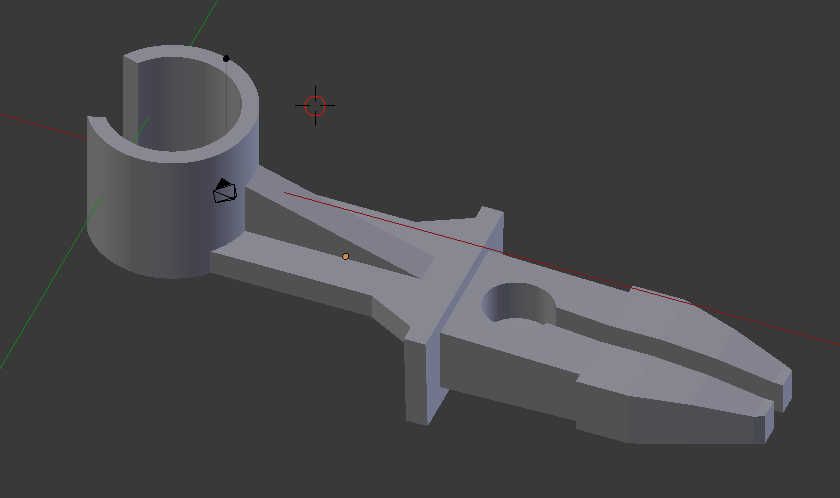
After a couple of tweaks and test prints, we ended up with the design you see above. This design narrowed the width of the dovetail by about 0.5mm, instead of making half the cylinder parts at the end of the dovetail protrude out, they were now part of the width of the dovetail itself. We also lengthed the size of the cut and increased the diameter of the cyclinder that was cut, two things that we learnt from the Eurostar coupling project.
This design worked very well, however when testing it with heavier loads, we noticed that some NEM pocket sizes weren't quite uniform with the standard. So while the coupling worked fine with some rolling stock, other rolling stock, the coupling would fall out of the NEM pocket under some loads.
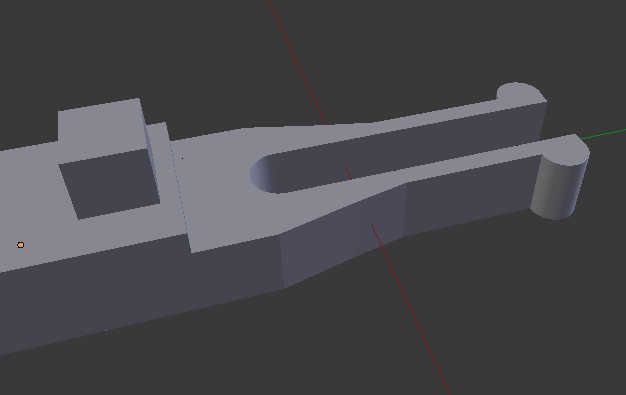
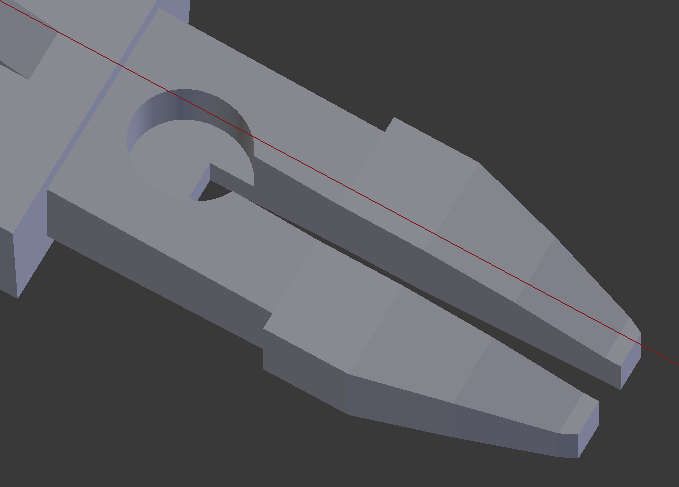
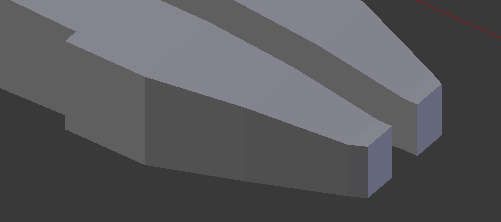
Taking what we learnt from the same problem on the Eurostar project, we added some width to the dovetail at the coupling end for a few mm then narrowing it on a slope towards the middle of the dovetail. We also added a cube-style piece to make sure the NEM coupling couldn't be pushed in too far. This results in a perfect connection everytime. For NEM pockets in spec, its narrow enough that the connection is snug but doesn't require force to get it in. For slightly larger NEM pockets that are out of spec, the cube-style block has a piece (on the right) that steps up that provides a snug fit on those larger NEM pockets without impacting the use on standard NEM pockets.
Next Article...
In the next article we will look at how we went about adding magnets to our coupling design and the different types of configurations you can achieve with magnets.
Comments